If you want to clone a disk drive, for example if you switch between a HDD and an SSD, if your old drive has a problem or to clone a full system, you might not want to reinstall everything from scratch even if the destination drive is smaller.
In this post I explain step by step how to do this using only free software and minimum hardware.
Obviously, you will need two disk drives (your original one and the one to copy to), the software Macrium Reflect free and if you cannot mount the two drives at the same time (if you want to clone a laptop with only one slot for the hard drive for example) you will need either an external disk where to store the image of your disk to clone or your can use a USB to SATA cable for a direct copy.
The following cable should do the job (affiliated link):
Start by installing Macrium Reflect and create a recovery media. To do so, click on click on “Other tasks” and “Create Rescue Media”. Follow the steps until it asks you where to put the image (USB or burn it on a CD/DVD). Note that the image for the recovery image was for me around 150 MB so a CD or a very small and old USB drive will do.
Turn off your computer, plug the USB drive or the CD/DVD media and boot it up to check that it works.
If you intent to store the image of your disk on an external hard drive, check that this disk is recognised by the recovery environment as you will use it to push the image to the new drive.
If you can mount your second disk into the computer or if you have the USB to SATA adapter connect the disk now.
Restart your normal system and run Macrium Reflect.
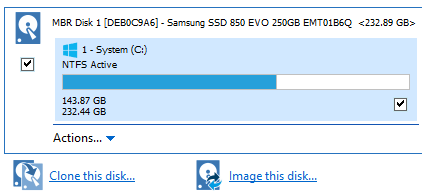
If you want to clone the disk directly, it is the most simple, click on clone this disk , then select the partition(s) that you want to clone on the other disk (the used disk must be smaller than the total destination disk capacity) and click one “copy the selected partitions”. You will be able to change the partitioning the way your want it. Follow the process to the end and the software will copy your data so your new disk is ready to go.
If you want this procedure step by step I advise you to read the tutorial that I used to guide me on How To Geek.
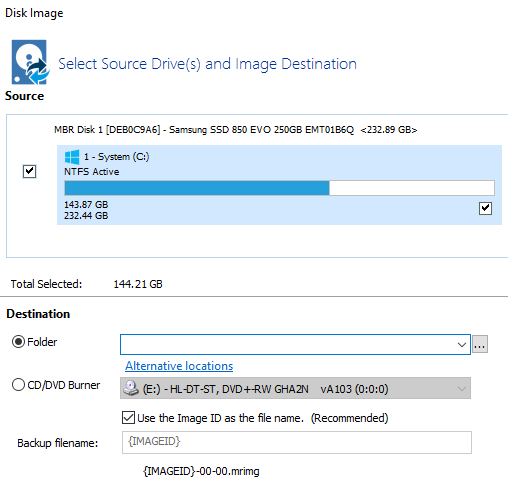
If you want to create an image of the disk on an external hard drive and in a second time copy it to the new disk, then click on “image this disk”.
You will then be prompted where to store the image, you can select your external hard drive on the bottom part of the window.
Once the process is done (it can be long if you have a lot of data) the image of your disk will be done and is ready to be deployed on the new drive.
Interesting observation: the image was for me around half of the total used space, which means that there is some kind of compression.
You can now boot up the recovery media, select restore, navigate to your external disk, select the image and let the program copy everything to the new drive.
Once the process is done you can reboot and enjoy your old system on your new disk!
If you have a problem, like the new disk not booting up, check your BIOS config (spam the button Del or F2 straight from the boot) or use the recovery media troubleshoot functions to help you.
The tutorial on How To Geek also has some troubleshoot advice.